Jan 31, 2014

New Catalog Time

I can hardly wait for tomorrow. That is the day that Close to my Heart officially launches our new Spring/Summer Catalog. I've been having so much fun playing with the pretty papers, and now so can you. Today I played with the paper packet called Ariana. My goal with this card was to prep a Valentine that I could give to my boys. I love when a paper packet that seems so feminine (this packet has a lovely large floral as well as a pink small floral pattern in it), also contains paper that can be used for a masculine card. I created this card using the weekly Mojo Monday Sketch to launch my creative juices. Here is the great sketch for this week:
 
Here is what I came up with for one of my precious boys:


Just a pop of pink, but a whole lot of Love!!! Tomorrow I will be able to come back to this post and link the new paper packet and catalog for you to enjoy!!


You can't tell by the picture, but one of the things I loved about this sketch is that it isn't your standard 5 1/2 X 4 1/4 size. While it will still fit in that envelope, it is cut down just a little bit smaller, this mixing it up just a little bit. I don't know about you, but little things like that give me just enough challenge to keep it fun!! Wishing you some time to get crafty and create a few Love-ly creations for your loved ones this Valentines Day.
 
 
*update* It's live now. Here is a picture featuring more of this gorgeous paper packet Ariana:
 
 
Products used :Stamp set~universal backgrounds on the middle gray piece (retiring Jan 31, 2014), Whoo's Your Valentine for the I heart you sentiment and the chevron pattern across the heart (retired constant campaign set), Holiday Tags (round circle and sentiment), Slate cardstock for the center piece, light green and patterned papers are from the Ariana paper packet , inks used are Outdoor Denim, Grey Wool, Black, and Tulip (retired).
 

Jan 14, 2014

Prepping my Valentines

This week, I jump started my preparation of Valentines Cards by taking a peek at the Mojo Monday Challenge. Here is their sketch for this week:

 
I got out my new packet of paper (available February 1st) called Ivy Lane. It is just lovely.  The stamp that I used on this is from the January Campaign called Cloud Nine. I absolutely love the cute stamp set that come with this special promotion.The stamps also coordinate with our CTMH Artiste Cartridge.  They are so fun!


Jan 8, 2014

Mojo Monday 327

Way past due for publishing some of my work. While keeping up with my four children, holidays, and sickness have taken up most of my free time the past few months, creating cards has not left as a desire of my heart. Finally got some time to play. This week my motivation came from MojoMonday's weekly challenge ~

 
This is the weekly sketch that launched me on to complete these:


5 Guy Cards using soon to retire Tommy Paper

and 4 Girl Cards using retired Claire (Fall 2012)

Here is an upclose picture:


I love how these came out and that I now have some cute cards on hand for upcoming birthdays. Stay tuned for pictures of more Love-ly creations using our newest line of Paper Packets to be released February 2014

May 29, 2013

Dream Pop


While this Paper Packet is no longer available (Spring 2013 Dream Pop special), I love the way these cards came out and wanted to offer the inspiration here for you!


Apr 30, 2013

April Update

I have been really blessed to be able to get crafty over the past two weeks and hold not only my Easter Scrapbooking layout, but also to create several Love-ly cards for upcoming birthdays and Mother's Day. I wanted to share a few with you here.

First let me show you the layout we created for my scrapbook workshop:

 
We created this one together. The ladies who bought the Chantilly Paper Packet and Dimensional Elements were also sent home with directions for creating the layout below as well. I had a few new ladies attend this workshop. I sure hope they had fun and that I didn't overwhelm them. I really have a good time creating pretty layouts.


While I had my Chantilly packet out, I have been having a great time playing with it and creating some Love-ly birthday cards. I also had the ladies create one as a bonus project. Here are a few I have made in the past week using this paper packet and my CTMH Cricut Cartridges:

 
To create these, I used my Art Philosophy cartridge to create the sweet little cupcakes (size is 2) and I used my Artist cartridge to create the little bow (page 55, size .80). I didn't think I liked this paper packet when I first set eyes on it, but boy, after having had a chance to play with it, I love it. So springy.
 
Onto another card  I just created that is very CLOSE TO MY HEART. My sweet eldest daughter will be turning 17 next week. I had to create a Lovely card for that special event.
 
 
To create this card, I used paper from an exclusive packet of paper available only in May called Dream Pop. It is available for $10.00 with any $35.00 purchase of current products.  The colors are so fresh and the papers (some are embossed and shiny while the other side is mat to coordinate with the patterns), while made primarily for scrapbooking (in honor of National Scrapbooking Month), are very versatile and fun. As you will see in the next few photos, I had no problem cutting it up and using it so make some really great cards.  For the one above, I used my Artiste Cartridge to cut out the dress (I love that dress), the heart, and the sentiment "Birthday Girl". I added a little bit of our fun Washi Tape and a little grey bow on the dress. Love, love, love how it came out.
 
Here is another I made from the same sheet of Scrapbooking paper, just turned it the way I thought it would look best on the card.


Here are a few Mother's Day cards created using the Dream Pop Paper Packet that I made for my hubby's Momma and my sweet Mother in Love:
 
 
Here is one I created for an upcoming wedding. To create this lovely card, I used the For Always Paper Packet, For Every Occasion Stamp Set (currently retired),  along with my Artiste Cartridge.


Last but not least tonight I have for you a couple for the boys in your life. The Later Sk8r Paper (retired) is another fun and versatile packs of paper that Close to My Heart put together for us. The month of May bring not only #17 to my daughter, but also #9 for my youngest son. Had to show him some love through my cards too.  Aren't they great? Those little gears were cut using my Artiste Cartridge from the coordinating cardstock in my packet. So easy and quick.


That's it for now. Time to get to bed and then up early to share the May Specials with you. Your going to love the May Stamp of the Month and the Beautiful Dream Pop Paper Packet.
 
PS. If you enjoyed any of my creations, be sure to let me know by leaving a comment, or pinning my photo on your Pinterest Board. Thanks so much.


Apr 8, 2013

Creating with Canvas

Check out this video showing how to create a super cute personalized Canvas Display. These cost just $4.95 added to any CTMH order. What a great and personalized gift this would make.


                                           My Creations Canvas How To Video

I am definately going to have to try my hand at making these. I love the endless possibilities of projects I can create with the products from Close to My Heart.

Mar 7, 2013

Mojo Monday #283

Made my first Spring card of the season last night. What do you think?


To create this card, I used a paper pack from CTMH called Lucy (retired). When I opened up the bag of paper scraps I had left over from last year, it just said "spring" to me.  I used a little bit of Silver Glitter Gel  and white hemp to add some pop to a pretty pink butterfly. I also used the Close to my Heart Art Philosophy Cartridge to cut out the butterfly and the white banner along the bottom. The button in the center of the accordian flower came from one of my Cuddlebug folders, but I could have also used my Artiste Cartridge to cut out a button shape as well. I just happened to find the button shape already cut sitting in my bag of scraps.
 
Inspiration for this card came from this week's  Mojo Sketch. and a Heart2Heart Challenge. . Be sure to visit their sites and view the other Lovely entries.

Mar 6, 2013

Update Time

Here is a glimpse of some of the projects I've been working on over the past several weeks. The first ones feature the gorgeous new paper pack called For Always (retired). Along with several sheets of beautifully designed black & white background and texture paper, you also receive a few sheets of contrasting bright colors to liven it up. Check out the cards I've made using this pack.


This one also features one of my favorite new stamp sets called Frame Flair. It coordinates with the CTMH Artiste shape so that you can create that lovely mat and box shape for the sentiment on the front of this card.
 
 
Aren't those gorgeous? This is my favorite of the new paper packs right now.The one above features some additional items cut out from the Artiste Cartridge (the heart, the bird and the blue box matting the sentiment).
 
 Just for your viewing pleasure, I've included a few more pics of recent cards. Not all feature Close to my Heart paper. Shhh. Sometimes I use other paper. It's true.
 
 
While I didn't use CTMH paper on that one (it was from a pack my children got me for Christmas from Michael's), I did use my CTMH Artiste Cartridge to create the "Bride and Groom" writing on it, as well as the text box that holds said writing. I also used it to create the beautiful roses, leaves and banner along the bottom. I added some Opaque Adhesive Gems to the center of those roses.
 
Last night I put the finishing touches on a few guy birthday cards. The night I started these cards I just couldn't get them to come together in a way I liked. Anyone else ever have nights like that? Anyway, I put the cards and pieces I had cut out into an envelope to re-visit at another time and last night I pulled out that envelope and very quickly put these together.
 
 
I cut out the card shape  and the starts using my CTMH Art Philosophy Cartridge. I used the size 4.25 for the card in Cashmere Brown Paper. I cut a coordinating white shape at size 4.0. I also cut one more coordinating shape in Chocolate Brown Paper and cut it into two pieces, using one piece on the top of each of these cards.  The birthday banner and cupcake are from the stamp set that come with the Artiste. I love how I have a shape and a stamp that go together perfectly.  I added some Silver Glitz Glitter Gel to the center of the Stars and on top of the cupcake just for a little extra pop of color. I love how these came out, and I love having two more cards for upcoming birthdays.
 
One more thing to show you. Due to the great special that Close to my Heart is offering on Studio J layouts until the 15th of March, I completed a few. Here are my favorites:


Oct 13, 2012

3-d Birthday Box

It's been a few weeks since I've had a chance to sit and get crafty. Lucky for me, it's been for good reason. My husband, children, and I recently decided to have an impromptu get-away in celebration of my 20 year anniversary. Hard to believe it when it seems like just yesterday we said "I do". Anyway, that and getting back to our homeschooling year has left me with little to no time to sit and play.

I have a few special birthdays coming up next week and wanted to try my hand at creating some of the 3-d boxes that are available on the new Cricut Artiste Cartridge. Here is the first one I came up with:


 I filled it with a little bag of chocolates that I re-packaged from a bigger box.


I used my Artiste Cartridge along with Cricut Craft-room so that I could enlarge this pattern as big as  possible. I also added in the cut out window to show the chocolate inside.  The roses and leaves I added as additional decoration using the same cartridge. The paper packet I used for this is called Flirty. I didn't want to use my patterned paper from the packet until I had a chance to do a sort-of trial run so I used the solid paper from this packet and then added the patterned paper to pretty it up. I really like the way it came out and plan to make several more as little gifts to have on hand.
 
I must share my inspiration came from a fellow CTMH consultant. Here is the link to her blog:
I found the picture on Pinterest and decided to start playing based on hers. Hopefully I am able to inspire some of you to get out your Cricut and create something Lovely as well.

Sep 16, 2012

Mojo Sunday Time for Me ...

A week is not quite complete for me unless I am able to somehow squeeze in a little PT (personal time). While it may sound a bit selfish, I assure you it's not. I am usually thinking ahead to what cards I am going to need in the very near future, so I need my PT to create those LOVE-LY cards.  This week I was in need of a cute card for a very special girl who is turning 17 next week. I used the Mojo Monday sketch for this week as inspiration. Here is their sketch:


Here is my creation using this sketch:


I simply turned the sketch 90 degrees. Since I was thinking birthday theme ahead of time, it made sense to me to use balloons down the side. To create this card I used my stash of Close to my Heart products.
 
Card Ingredients: Clementine Paper Packet, Saddle Ink, Twilight Ink, Sorbet Cardstock (came in my paper packet. I used both of my CTMH Cricut Cartridges (Artiste and Art Philosophy) to cut out the balloons, the banners, the flower/leaves, and the scalloped circle.  I had a lot of fun using some of the coordinating stamps that came with my new Artiste Cartridge (the balloons and the banners). I love that I can stamp the images any color. Makes the creative possibilities endless. I also plugged in my Cricut to my computer to hook up to Cricut Craft Room. This enabled me to cut another balloon without the little sliver cut out of it (the brown ones I put behind my stamped images). Any other questions, feel free to leave me a comment and I'll be sure to answer as quick as possible.
 
 
Can you see the cute little banner stamp and the balloon stamp that I used from this amazing Cricut Collection? Loved getting a chance to play with my paper and scissors today. Hope I can get to more very soon, but for now, time to go help Mr. Wonderful cook up some dinner.


Sep 7, 2012

Mojo Monday September 7, 2012

This week I was in need of a few sympathy cards.  I was thankful for the new stamp set from Close to my Heart called Words of Comfort  and the Mojo Monday card sketch 257 to help me make these cards convey our heartfelt sympathy for our friends.


Here is the card I created using the sketch shown above:


created by: Michelle Rodman
 
Ingredients I used to create the card I created:
 
Close to my Heart Avonlea Paper Packet, Cricut Art Philosophy Cartridge to create the roses, butterfly, scalloped circle and white circle, scalloped brown edge and the small tag with the word My Friend on them, retired CTMH stamp set called Say it in Style, CTMH stamp set Words of Comfort, Mocha Opaques Adhesive Gems.
 
If you enjoy my creations or posts, please take a moment to leave a comment. They always make me smile. :-)   Thanks so much.

Aug 5, 2012

Mojo Monday #252

Last night I had a chance to play with my paper and decided to start out with the weekly challenge from Mojo Monday. This weeks challenge is super cute. I love square cards and I love hearts on my cards and this challenge included both. Check it out:


I have been using paper from a new Close to my Heart Packet called Clementine this week in preparation for an upcoming card workshop so I decided to stick with that paper as I created this weeks sketch challenge.  Here is what I came up with:


This card is a 4.25 X  4.25 square. I used a white cardstock base and layered a new color in the CTMH product line called Saddle. I added a little extra embellishment with the dark brown bow and some little Opaque Adhesive Gems in Mocha. I am not entirely in love with it, but I will say I am glad to have it ready in my stash of cards, and it got my juices flowing for a few more cards I came up later in the evening.After I created it, I went ahead and scrolled through some of the other Mojo Monday entries for this sketch and found some really gorgeous ones. No doubt I will be playing around with this sketch a little bit more before I move onto  the next challenge from Mojo Monday.

Aug 3, 2012

Card Workshop August

Please join me for a card workshop I am hosting on Monday August 13th  2012 from 6:45 to 9:15. We will be be creating 10**, yes, 10 LOVE-LY cards that are of various occasions so  you will be ready for your next card giving opportunity. The cost for this class is $10.00*. We will be using paper from the new Clementine Paper Packet to show you just how versatile one package of CTMH paper can be. Space is very limited so please RSVP to me by Friday August 10th to save your spot.


* Class fee is cut in half for anyone placing a $25.00 order in CTMH products the night of this gathering, or for anyone who brings a friend who has never been to one of my workshops before.**Also, do not feel pressured to complete them all. If you only want 5 cards, just make 5 and the fee is reduced based on how many cards you actually make and take. I am here to help you make your papercrafting wishes a reality.

I will have everything you need precut, ready for you to stamp, glue, add embelishments and take home ready for the next special event in  your life. Embelishments may vary based on what I have available. All you need to bring is yourself (and a friend if you want to).  See you soon.  ;-0)

Jul 22, 2012

Summer Scrapbooking Layout(s)

Guess what the challenge is this week over at  Heart to Heart Challenges? Water Fun!! Just the challenge I needed to help get me ready for an upcoming scrapping night I'm hosting this week.

It's not an official class, but rather just a few close friends coming over to join me in doing some scrapbooking. One friend offered to bring dessert. Doesn't get much sweeter than that.

 Anyway, I decided to go ahead and get an early start so that I can be a good hostess and have something a little bit inspiring to get them started. Here is the layout I created tonight:

Footloose Summer Layout


I really love how it came out. I used a packet of paper from Close to my Heart called Footloose. This paper did not excite me when I first saw it. However, I began to see some really cute scrapbooking layouts being shared on Pinterest and on some consultant blogs. It began to grow on me. So glad I decided to get some to use for this summer's pictures. I also used a few of the coordinating dimensional elements. LOVE IT!!!  

I am in the process of doing a few more summer layouts while I am on a roll with this paper packet. Here is another one for you:

Another Footloose Creation

Can you spot my boo-boo? I erroneously stamped the date incorrectly. As I marveled at how I managed to do that, I then spotted a photo I almost added that was from 2012 instead of 2011. Thankfully it was fixable. I love looking back at how much my children have grown even over just a one year period of time. I added a few cutouts from a Cricut Cartridge I had on hand called Life is a Beach. Next to my Close to my Heart Art Philosophy Cartridge, I think this one is my second favorite cartridge that I own. Lots of fun summer goodies are on it. Perfect for doing beach layouts like this one.


If you are interested in learning how to scrapbook your memories, please contact me. I can teach you how to preserve your memories and celebrate your relationships through scrapbooking!

If you are already a scrapper but need a little inspiration now and then, be sure to check out H2H Challenges to see creative ways to use your favorite Close to my Heart products.

Let me know what you think of my creations by leaving me a comment. They really make my day.

Thank You

It seems that lately I have lots to be thankful for. For that reason, I have had to come up with a few masculine thank you cards of late. I thought I'd show you what I came up with as I think they came out really nice.

Thank You Friend using Typset Paper Packet


I created these cards using Close to my Heart paper packet called Typset. Unfortunately, this paper packet retires very shortly (Aug 1st). The good news is that perhaps you can use it as inspiration for paper you have on hand, or use the some of the new paper packets that are coming out August 1st . When you combine the cute paper included in the packet, with the solid cardstock that coordinates (also included in the packet) with the Cricut Art Philosophy Cartridge, the possibilities for creating great cards are endless.

Sweet Birthday Wishes

Just when I think I have a handful of cards on hand to last for a little while, another sweet friend has a birthday and I look to my basket of cards and realize "gasp" I need to make more. That is actually not a problem, but a blessing as I LOVE to make cards and I love to have friends who fill my life with joy. This week I used the Mojo Monday Sketch as inspiration for the card I created. Here is their sketch for this week:


Super cute, right? I thought so. Here is the card I created using this inspiration:


To create this lovely birthday card I used a paper packet from Close to my Heart called Florentine, my cricut Art Philosophy Cartridge to create the pretty little flower,  the leaves, the paper ribbons, as well as to cut out the circles I used for placing my sentiment. The sentiments are retired CTMH stamps. The bow was actually created off of the card (it's easier that way) and then I just glued it right over a strip of ribbon that I ran through the middle of my cardstock. Another week I am blessed to use the Mojo Monday sketches as inspiration.Hope I have inspired you to check out their blog and get busy making your own Love-ly cards.

Jul 16, 2012

Birthday Cards-masculine theme

Elemental Birthday Cards

Just wanted to share with you a few cards I whipped up this weekend. We had a birthday party to go to for a family member who was turning 8. I had just finished making a card for a 7 y/o the day before using my Super Hero Paper packet so I was wanting to do something different. I pulled out my Elemental Paper Packet and came up with these while the family watched a Saturday evening movie together. I love that I made three so that the next two I need will already be in my basket ready for gifting.

I really just let the cute paper do the work. I did add a little bit of Silver Glitter Gel to the top two cards and some Mocha Opaques to the bottom card. I used my Art Philosophy Cartridge to cut out the cupcakes and used my coordinating stamps to stamp them in brown. On the bottom cupcake, I ran the bottom portion through my paper crimper to give it a little dimension. I love how these came out.

If you enjoy the possibilities of this paper packet, you need to contact me ASAP as it retires the end of this month. Augh!!! I will miss the versatility of this great paper.

Jul 4, 2012

Ahhh,..... Summer

Well, it's that time of year that I look forward to most,.... Summer. The mountain is all green from a winter full of snow and the temperatures are in the 70's. Homeschooling is pared to just a subject or two and we have this expanse of time to relax a little bit.  You know what I am looking forward to? Yes, you guessed it, making more cute cards and catching up on scrapbooking.  If that is one of the things you look forward to as well, I hope I can share a bit of what I am doing to keep you motivated and moving forward in achieving those goals.

Just wanted to share a few of the cute cards I have made over the busy month of June:


This great card was made using the Paper Packet Typeset. It will be retiring soon, so if you like it, be sure to get your order in to me by the end of July. I also used the coordinating Typeset Complements Canvas Shapes. This paper also makes really cute birthday cards or just general Guy cards with the dark and neutral colors. 

Here are the Father's Day Cards that I came up with this year:


To create these cards, I used my Victory  Workshop on the Go kit. These kits contain not only a full packet of paper, but also an exclusive stamp set that you can't purchase out side of the kit, as well as coordinating embellishments (in this case the Durable Square Studs and Natural Hemp).  I also played with my White Daisy Pigment Based Ink to create the cool background paper on the one shown on the top right corner. To create the two matching cards, I used my Cricut and Art Philosophy Cartridge to cut out the banner shaped card, cut the paper to match the shape, and to create the star and the #1.  I changed out the cartridge to write the word Dad, but I could have used the Art Philosophy Cartridge to do it as well. The letters would just not have been welded together (unless I used the Cricut Craftroom which I did not want to hook up at the time).


There are a few pregnant Momma's at my church right now so I had several baby boy cards that needed to be made in June. Here is the latest one I made:


This cards was created with some retired products. I used Wonderland Paper (which you just  might get this month as a special part of the Constant Campaign for July). I love the way it turned out. I used my Cricut and Art Philosophy Cartridge to cut out the decorative squares and circles on the top portion of this card. Easy Peasy!!

Hope you get some time to play too!
\

Mar 28, 2012

Mock Half-cut Technique


One of the things I love about the website Pinterest is that you can get some new creative ideas on just about any topic. Well, of course a topic near and dear to my heart is card making. Therefore, each and every time I log onto the site, my eyes just take in tons of new papers, color combinations, ways to use my Cricut, etc. Tonight I wanted to attempt to create something similar to a card I'd seen on there. I want to be sure to give credit to the original creator so here is the link to her site based on the link I found on Pinterest ~ http://debbiesdesignsblog.blogspot.co.nz/2010/04/half-cut-die-tutorial.html. She called her technique a half-cut-die-tutorial, but I did not use a die, therefore, I am not sure what to call this technique. However, I am willing to attempt to share my try at recreating the results.

Her tutorial was teaching about how to cut out only half of a die, using a die cutting machine. Well, I don't have that die or die cutting machine. Hmmm. What to do, what to do? Do I go out and purchase yet one more thing??? I just did not think that was the answer. Therefore while I went about my business of taking care of my family, visions of that card and how I could create it kept mulling over in my mind. I decided to have a try at it using my Art Philosophy Cartridge.
I first tried logging onto their free site ~ Cricut Craft Room. Once in there, I tried going through each of the tutorials to see if I could cut just half of a shape. No luck. Hmmm. What to do now. I decided to go ahead and cut out the entire shape and see if I could somehow piece it back together to achieve the same look. Tadaa!! Success. While it isn't quite as streamline with just one piece of cardstock, I still think the achieved look is pretty cute. What do you think?

Outside view of card

Inside view of card


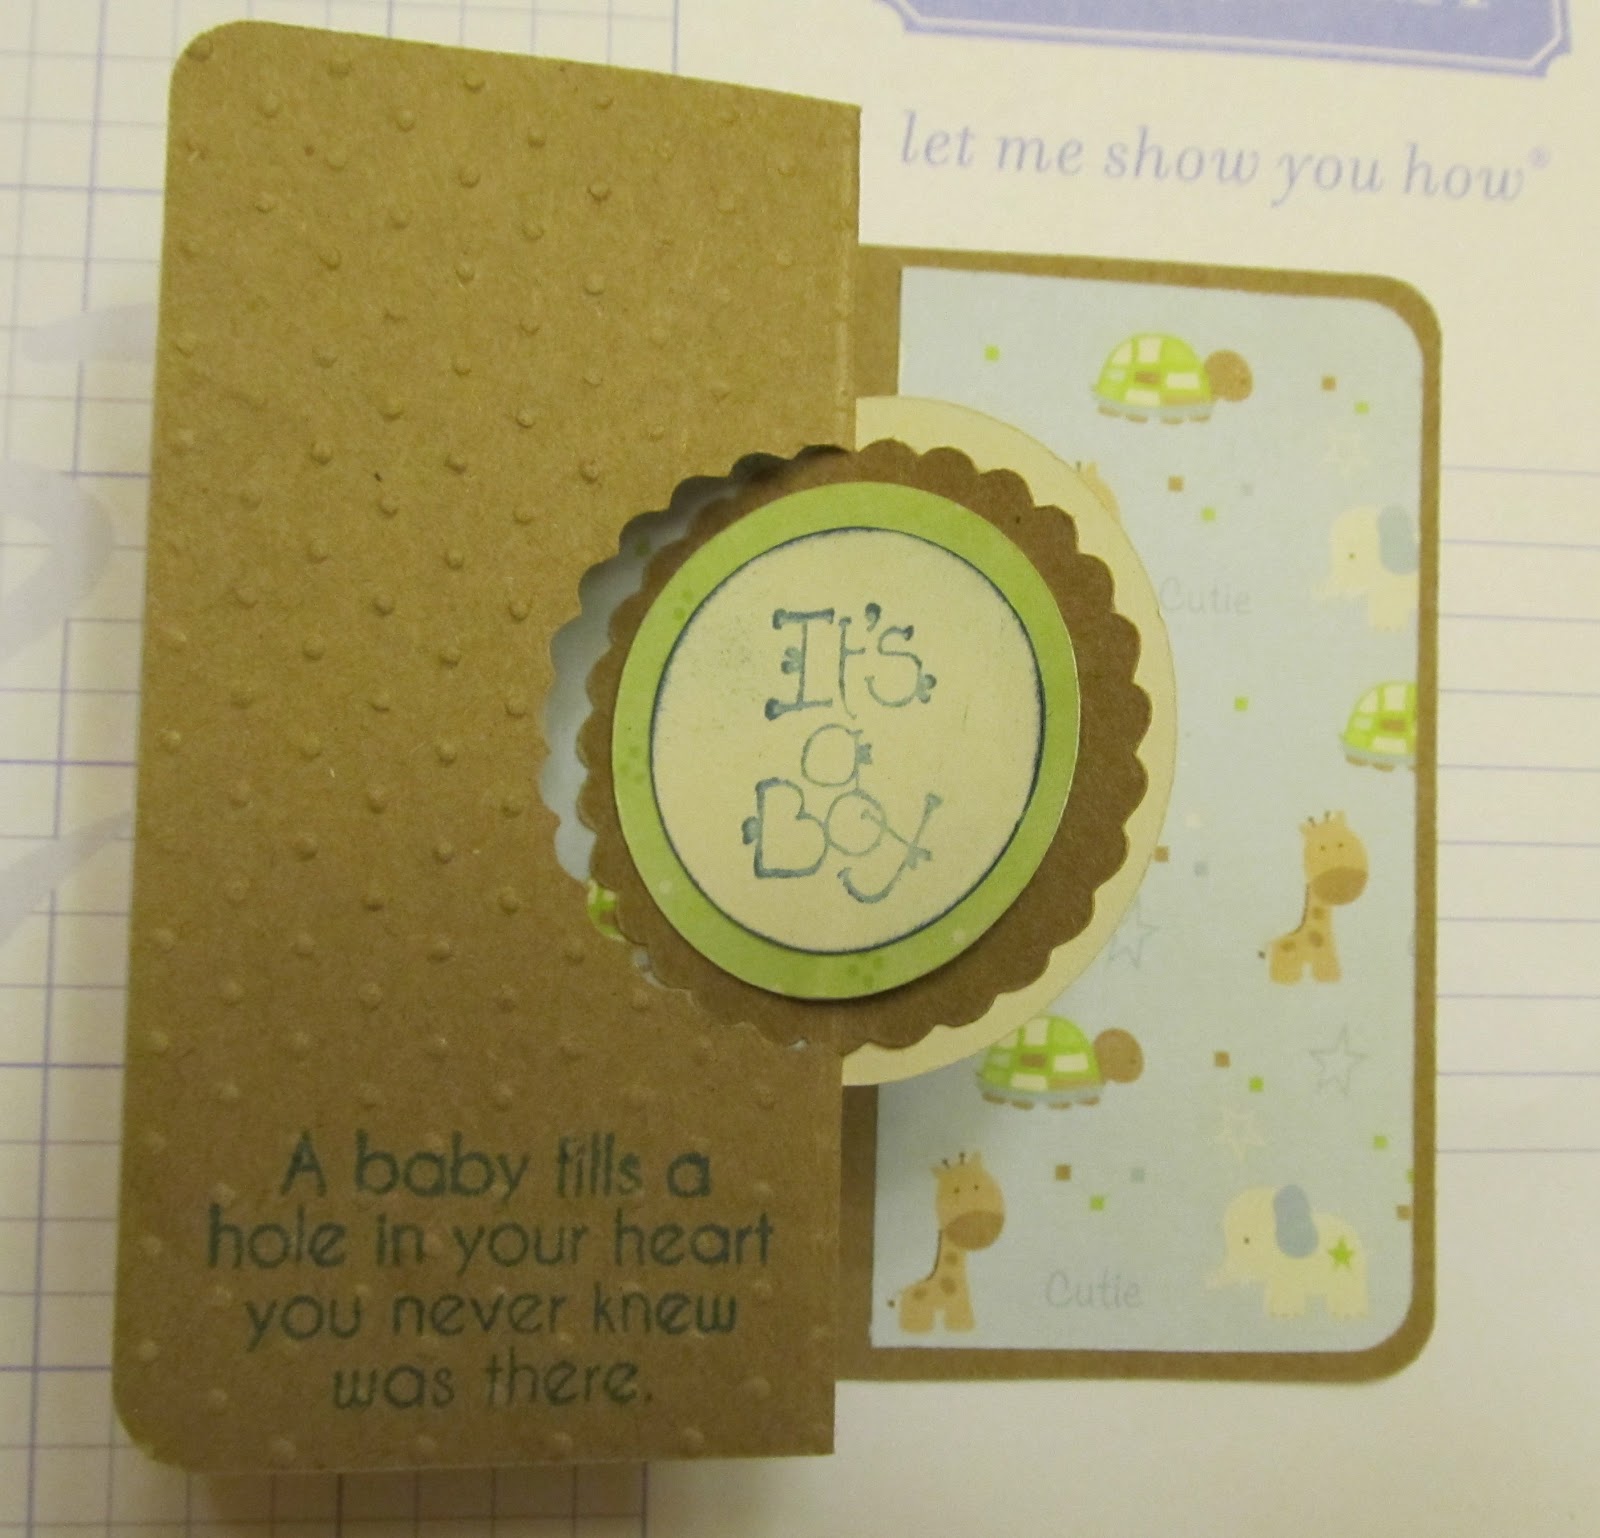
Baby boy card


I think they turned out really cute. I cut them out using the square card option on my Cricut Art Philosophy Cartridge. The size for the card was 4 inches. I actually did use the online Cricut Craft Room  to help me center the cut out in the middle of the card. It is pretty nifty how you can click and place your cuts exactly where you want them on an online cricut mat, hook up your computer (laptop in my case) to your cricut expression and then hit cut. I don't think I could have centered those cut outs from the center of the cards without using this feature. I then used my scoring tool to score and then fold down the center of the cut out shape.I folded it back how I wanted it and then proceeded to decorate it using paper, stamps and a little embelling (the little 3-d dots) from one of the folders on my Provocraft Cuddlebug.

The baby girl card is created using Chocolate Card Stock cut in the same size (4 inches) with the cut out centered (2 inches using square shape) using the Craft Room again. On the girl card I cut out a square rather than the scalloped circle as I was wanting to match it up with the coordinating stamp set  called New Arrival that I used for that card.  I decorated that card with some of the yellow B&T paper that will be featured in an upcoming CTMH April Special.  This paper packet is called Dotty. You won't want to miss the opportunity to get yourself a pack of it at the great price they are offering it at. Details to follow in April.  I also used some of our Baby Pink Card stock that I had on hand. I cut it out using the same template as the original card  and then ran it through my Cuddlebug to give it the bumpy texture you see. I then glued it down over the Chocolate to create the color scheme shown above. I also proceeded to cut out a few extra 2 1/4  inch squares for that one in the coordinating colors to give it extra support over that cut out portion, as well as add in more colors. I cut out a piece of Colonial white and the yellow Dotty B&T paper just a bit smaller than the card (3 3/4 inch size) to piece together the inside. That way I don't have to write my sentiment on the dark brown cardstock.


The cardstock for the boy paper is Kraft c/s from CTMH. The B/T paper on the boy is some I had on hand (not CTMH, I think it is by Imaginisce). I actually covered up half of the cut out (thereby achieving the look I wanted in the first place) with B&T paper that matches the paper shown on the right side of the cards. I then placed the cut out back in the center (matching it up the best I could). I proceeded to re-enforce the back as well with some more layers of matching Background and Texture Paper.

There  you have it. Time for bed.  If you learned a little something here, feel free to leave me a comment and/or pin my cards to your Pinterest favorites. :-)

New Arrival Stamp Set  (currently retired)