
If you are just getting started making cards, then this post is for you. I have been creating cards for loved ones for just about 15 years now. Once I got started, I just could not bring myself to 1.) give up the fun of having a creative outlet and 2.) pay $3.00 or more for a card I could make myself with the supplies I had on hand. Just what are the supplies one must have on hand? I will attempt to list the ones I use regularly and let you know where to get them as well. It's a long post as I am attempting to truly help someone who is brand new to stamping or is just wondering what it would take to get started. Even so, I am sure I will overlook something or other, but I will do my best to come back and update as I remember.
Let's start with paper. Most of the cards I make start with a white card stock background. Exactly how you get that white card stock background can come in a few different ways. 1.) The least expensive way is to purchase a ream of card stock (100 lb. weight is my current favorite). You can pick up a ream of 8.5 X 11 white card stock at either Target, Walmart,... or my favorite is to go to a paper supply company. It will cost a little more, but you will get nice, bright, white, with a nice weight to it. Then you take those 8.5X11 sheets of paper and cut them in half on the long side so you end up with two 8.5 X 5.5 pieces of paper. You then take those two pieces and fold them again in half (folding the long side down) and you end up with two cards that are 4.25 X 5.5. I hope that made sense. You will then need to purchase envelopes. You can get this size envelope (the envelope size is actually just a tad bigger so the card can fit in it 4 3/8 X 5 3/4) at Staples or the paper supply company. It is also referred to sometimes as a size A2 envelope. You will want to make sure it is made for this size card. This is the standard size that most hand crafted cards are created on. Option 2.) is a little more expensive but much more convenient in many ways and that is to purchase your card stock through me. CTMH offers a variety of envelopes or even a card/envelope combo which includes 50 cards and envelopes the size I described above for only $14.95. That would keep you going for quite awhile and there would be no worry if your edges were cut straight. We also offer a variety of different size envelopes so that if you want to get creative and make your card a bigger size, we can help you get it mailed.
 |
| Paper Trimmer |
Now that we have card bases and envelopes covered, we will move onto paper trimmers. You will want to have one of these on hand to make sure the paper you use is cut with nice straight edges. There isn't a card making day that goes by that I don't pull this out and use it continuously. You can purchase one from me, or pick one up at a craft outlet store like Michaels. There really is a difference in how nicely they work. The nicer ones have a nice wide base with lines on it to help you cut in a variety of sizes. You will also want to be sure you can replace the blades when they get dull.
 |
| Bone Folder |
Another handy tool I use when I am cutting my own card stock bases from a ream of paper is a bone folder. Once you have cut your card stock the desired size, when you fold it in half, using your bone folder will help you make a nice crisp fold down the center. If you are watching your pennies, you may be able to skip this accessory and use the side of a pen to help make the creases nice.
Adhesive is another must have tool for creating hand crafted cards. Close to my Heart offers a variety of different options but I will share my favorites. I regularly use our Bonding Memories Glue. It comes in two different sizes and I use each of them for different things. I use the larger one to glue down bigger pieces of paper, and the smaller for edges and smaller bits of paper I am gluing together. This glue offers a two way bond. If you use it immediately while it is just been applied, it works almost like a cement with a really tight bond. If you wait a little bit, it offers a stickier, more tacky type of stick, not a permanent bond, but rather a temporary bond. Be careful to use it properly. I also use this larger Bonding Memories Glue to make my Cricut Mats sticky again (but that is another tutorial in itself). You can also use double sided sticky tape on your paper. I have purchased these at Target, online through Amazon (to help make me meet the minimum for free shipping), or best price is Sams Club. Shhhh. You didn't hear about the other guys from me. :-) .While you can purchase adhesive just about anywhere, I tell you I have come to appreciate adding it to my Close to my Heart order and not having to go into those other retail stores that end up costing me much more than I went in to spend. Or even worse, I unload my 4 children from the car to run in and buy adhesive. We load up on lots of other stuff I didn't need before I went in. Grrr. Yes, I've had that happen one too many times. Doesn't get much easier for me than delivered right to my door straight from Close to my Heart.
A great pair of scissors is certainly included in my kit of must have tools. I am especially fond of our Micro-tip Scissors. They are small and super sharp for detailed cutting of both paper and ribbon.
A great pair of scissors is certainly included in my kit of must have tools. I am especially fond of our Micro-tip Scissors. They are small and super sharp for detailed cutting of both paper and ribbon.
Last but not least is a few acrylic blocks. You are going to want to add some sort of sentiment and the most common way to do that is with stamps. Most stamp companies that I know of are now making all their stamps acrylic rather than rubber on a wooden base.That means they are made of a pliable plastic-like substance that sits on a carrier sheet, but not a permanent base. Therefore, if you were going to do some stamping, you would need a supply of acrylic blocks to attach those acrylic stamps to when you were ready to use them. These acrylic blocks come in a variety of sizes to coordinate with the many sized stamped images you may be using. I prefer to use one that closely resembles the size stamp I am using, rather than just have one large one and have to house little stamps on it. It is just easier to maneuver the smaller blocks (in my humble opinion). The great thing about the new acrylic stamps is two fold. Once you have acquired a few blocks, the actual stamps are less expensive to purchase, as well as the blocks and stamps are clear, therefore you can actually see through them. This makes stamping your image much easier than in the old days when you had to sort of guess where your image would show up under the bulky wooden housing. Here is a picture of an acrylic block and a stamp set to give you an idea of what I am talking about.

All of the stamp sets shown in our catalog will list with the price the recommended block sizes you will need for that stamp set. If you already have them, you are ready to use the set once you ink it up.
Ink would be next on my list of needed supplies. Close to my Heart offers over 60 different colors of ink to coordinate beautifully with our papers. Love the ease of creating loveliness when the matching sets are made so easy for me to choose from.
Okay, now comes the fun part. Once you have your basic supplies, you add your choice of beautiful paper, stamped images and sentiments, matching ink, and fun embellishments such as stickers, ribbons, or adhesive gems. The possibilities are endless.
Close to my Heart offers paper packets that include either different colored solid papers that look beautiful together, or patterned paper packets that include a few sheets of matching solid paper to make being creative easy. We also offer inks that match those same color combinations.
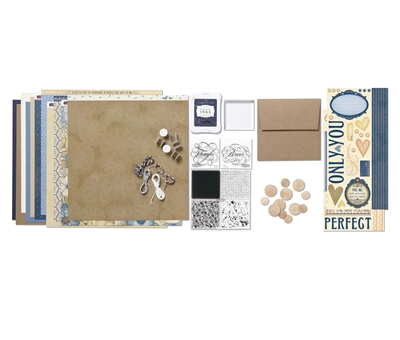
The picture above shows one of the available Hostess Collection benefits that a customer can acquire. I added it here to show the variety of products that can be put together to equal lots of creative potential. Shown above is a Pemberely Paper Packet, a matching My Stickease collection, a few stamp sets, a matching ink pad, an acrylic block, envelopes in Kraft color, and a variety of different embellishments to dress up your cards. As you may have guessed, the above products work not only for creating beautiful cards, but also gorgeous scrap booking layouts as well.
My very favorite inspiration over many years has been the Close to my Heart idea book. I actually have quite a collection of them. They come out twice a year and are full of lovely and creative cards and scrapbooking layouts using the products offered through consultants from Close to my Heart. Now you have the opportunity to see it right over the web in the comfort of your jammies by clicking on this link. Have fun. I've said it over and over, but truly, the possibilities are endless. Just need to add your imagination and personal touch to these great products.
Hoping I can help get a few of you started in a crafty outlet that is very Close to my Heart.
wow. Thank you so much. I had only heard of the bone folder (Thanks Martha Stewart lol). This was a fantastic getting started guide.
ReplyDelete@Jackie, you are very welcome. Thank you for stopping by. I really scratched the surface as the possibilities are limited by imagination, money,time, tools, etc.,... but one should not need to feel completely overwhelmed when get started. It really is a fun and crafty outlet, with the results being LOVE-LY cards to share with those you care about.
Delete